My main concern with iMovie ’08 several years ago was the complete removal of easily creating a DVD from within iMovie (via iDVD). Certainly this was addressed via the followup ’09 release of iMovie, but an issue still remained, and still remains today. iMovie uses single-field processing. This means that every other horizontal line of the video is thrown out, which reduces the sharpness of the footage. This quality loss is exaggerated when attempting to export to DVD, which is interlaced video.
I won’t go into the difference here between interlaced and progressive. I’ll assume that by now you’ve heard this 1000 times, with all the 480i, 720p, 1080i, 1080p jargon.
The simple fact is that the loss of that dropped second field really causes problems with DVD, which is 480i. Throw in an upscaling DVD player that exports at 1080p, and you’ll have a hot mess.
Luckily, there is a way to achieve the best results you can. Certainly the best way is to use a version of iMovie prior to iMovie ’08, such as iMovie 6 HD. Unfortunately, this really limits your editing abilities afforded by using a newer version of iMovie.
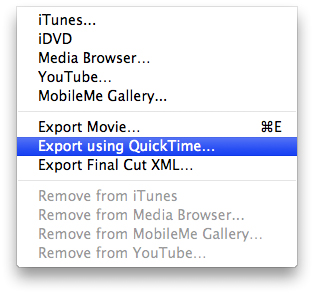 So, assuming that you’ll be using the newest version of iMovie and iDVD, the method of importing and editing your video remains the same. The quality retention (at least the best it can be), is handled when the video is complete, and being exported to iDVD. You’d think that using the Share > iDVD menu item would give you the best possible quality. This isn’t so. The trick is using Share > Export using QuickTime…
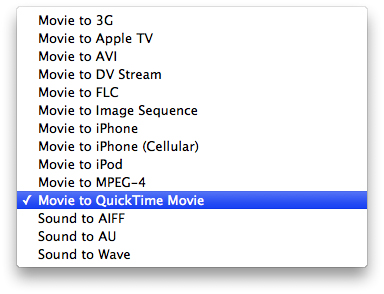
Once the dialog appears, choose Export: Movie to QuickTime Movie and click on Options…
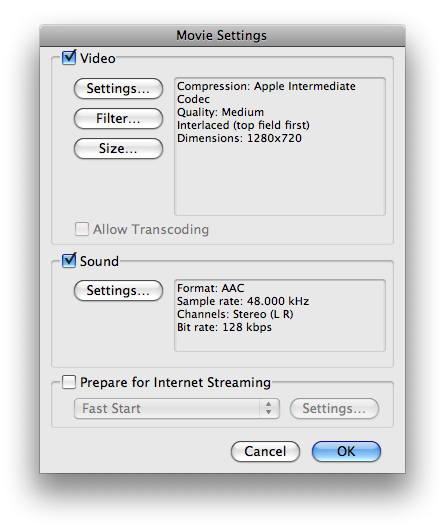
Make sure both Video and Sound are checked. Then click on Video Settings.
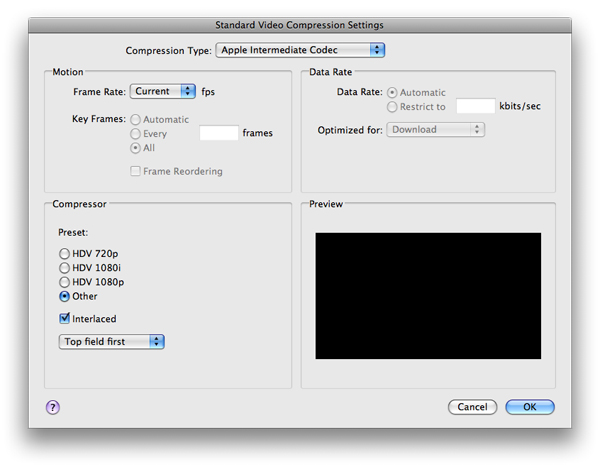
For Compressions Type, choose Apple Intermediate Codec, Frame Rate: Current, Data Rate: Automatic. Under Compressor, choose Other, check Interlaced, Top Field First. Click OK.
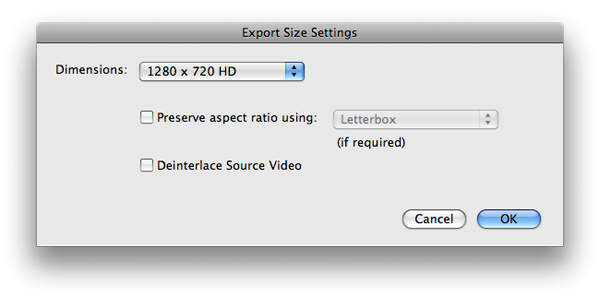
Next, click on Video Size. Choose Dimensions: 1280×720 HD. Make sure Deinterlace Source Video is unchecked. Click OK.
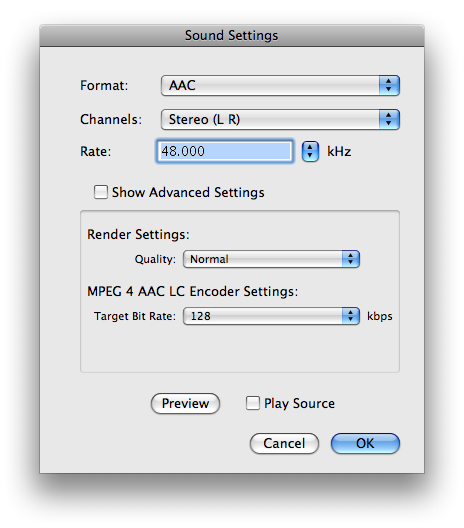
Next, click on Sound Settings. Make the settings match what is shown below. The sound settings here do not affect the quality of the video. You can adjust these as needed. Click OK.
Name your video file and click save. A special note here is that this will create a very large file: a rate of about 20GB per hour. Remembering that iDVD will need hard drive space that is double the final size of the DVD, you’ll need to make sure you have the resources.
The resulting video quality won’t be 1080p HD quality, but it certainly will look a lot better than using the Share > iDVD method. Your video and titling will appear with much less jaggedness. Certainly not super-crisp, but much better than the progressive version that iMovie would otherwise export.
Apple would like us to believe that physical media like DVDs are dead, but there still is a need for it.
While we’re covering iMovie and iDVD: I almost always provide an HD digital copy on the DVD-ROM portion of the DVD. This allows the recipient to have an ultimate quality version for their local media library, smartphone, iPad, or other digital device. I export using an MP4 container and the H.264 codec to provide maximum compatibility.
This has been today’s Clarified Butter.
