25 years? Wowza!

I’m not one for celebrating milestones. I don’t even set goals. I just do the best I can each and every day. The satisfaction in providing top-notch service with astonishingly quick speed, in my opinion, far exceeds the accomplishment of any mundane goal.

Yet, the other day I realized that 2018 will mark the 25th year for ProGravix. It certainly took a lot of work, and a few sidesteps early on, but since 1993 we have been offering graphic design (and, much later, web design and video services) with passion.

As a boy, I loved basic programming on the family’s Commodore 64 (with a lot of game time, of course – Frogger and Rampage come to mind). I had always loved computers, but never felt that programming was all that satisfying. That was the early years of personal computers. At the start of high school, I took several courses of COBOL and Pascal (computer languages), which I never really understood (and always failed). As a sophomore, I came across a class called Desktop Presentations, where they used Macintosh computers to create graphics. During the same year, I was learning the process of photography and developing film. For a photography class assignment, I used the photos I had taken, along with the hardware and software provided in my Desktop Presentations class to complete an assignment. It was the first assignment where I had garnered an A grade while using a computer.
In 1993, I had just turned 17, and finished up my Junior year of high school. By this time, the family computer had been upgraded to a Macintosh Performa. I was creating flyers for events, and designing other printed materials for family and small businesses. I also established the name ProGravix, and registered the trade name and trademark with Arizona’s Secretary of State. ProGravix certainly was a part time endeavor, with school taking priority. It was to become ever more pushed to the side…

Later in that same year, I began working at AlphaGraphics as a graphic designer. I had yet to graduate high school, but was proficient enough with PageMaker and Macintosh computers to amaze the manager, who offered me a position on the spot. While I had never pursued higher education, AlphaGraphics taught me a great deal. I made connections in the printing industry, and was part of many large scale projects in the Phoenix area. The fast paced retail environment was a challenge, but the insight into business management and offset printing afforded me a wealth of experience and knowledge.

By 1996, I had become exhausted with AlphaGraphic’s retail environment, and sought a position with Maricopa County’s Library District as a Senior Graphic Designer. The drastic change from fast paced creativity, to bogged down governmental status quo was dramatic. It was a nice change, but certainly not challenging enough. Moving from high volume, full color offset printing, to black and white bookmarks for youth and adult services seemed to dull my creativity. During these years at Maricopa County, I continued to pursue projects on the side – creating banners, menus, anything where my creativity could explode. During this time, I also became well versed in HTML, and the art of web development, having taught myself by reading the code of many popular websites. Although I was a vital component of the Library District, I worked closely with other departments such as Animal Control, Department of Transportation, Parks and Recreation, and the Stadium District, which oversaw the completion of Bank One Ballpark (now Chase Field). I was the go-to photographer and graphic designer for these departments – mirroring my sophomore year of high school.

In 1998, I chose to end my employment with Maricopa County, and begin an all-in effort to grow ProGravix. I had established many clients, and grew ever more knowledgeable about web development. This year also marked the beginning of ProGravix’s online presence.

In 2001, we became heavily invested in expanding the video services portion of our business, serving mainly as wedding videographers. From 2001 to 2005, we had created hundreds of wedding, graduation, genealogy, and remembrance videos. When the decline of the economy drastically curbed this service, we started to focus on very high end video projects for individuals or commercial endeavors.

Now, having achieved this 25 year milestone, I can assure you there is a lot more to come. ProGravix continues to grow, year after year. This is not achieved by advertising. We garner our business through our clients. By choosing to provide top-notch service day after day, we are choosing our quality and speed of service to speak for itself. Our clients share that with other potential clients, who begin to understand very quickly who we are, and what we do.

This has been today’s Clarified Butter.

Who do you recommend?

Creating a unique and eye-catching design for your print work is only part of the overall project. We’re constantly asked who we recommend when it comes to offset printing. In this digital age, you would assume that the need for physical materials would be diminishing. Nothing could be further from the truth.

A typical “branding” piece that is created after the development of a business identity and logo design is business cards. A business card is an affordable way to get the word out about your business. The quality of this card should reflect the service or products you offer. If your card looks cheap, so does your company. It’s important to choose the right printer – this is not a time to skimp. That’s not to say that it’s going to break the bank… just don’t choose the first “good deal” or “free” offer you see. For just a little bit more you can have amazing business cards.

Business Cards

For business cards, and any other full color printing, I recommend PrintRunner. They are based out of California, and offer incredible prices for immaculate quality. Of special note is the 14pt UV Coated or 14pt Gloss (AQ) Coated stock. Either of these options will provide a shiny, glass like surface – which will really make your colors pop. Of course they offer the typical Matte or Recycled paper options, which are great when you are trying to promote an earthy, “go green” feel.

I’ve used PrintRunner for postcards, business cards, letterhead, catalogs, banners, trade show booths – pretty much everything. We are not affiliated with PrintRunner, and make no profit for referring them. They are just that good.

So, when you are ready to get some physical materials printed – let us help design… then let us help you get it on over to PrintRunner. You’ll be happy you did.

This has been today’s Clarified Butter.

PDF Compression: Use it wisely

Nothing aggravates me more than individuals or organization sending out (or making available) important information in a Word file. How difficult is it to create a small, widely supported, open-source PDF? Not difficult at all.

Just below that level of aggravation is another matter spawned from a similar lack of detail. File compression. You know, making files much smaller than they really need to be. We all consume compressed music, videos and photos. Why not add PDF to that list? ProGravix delivers artwork in compressed ZIP archives, and we always create media consumed by our client’s customers in a perfectly compressed format.

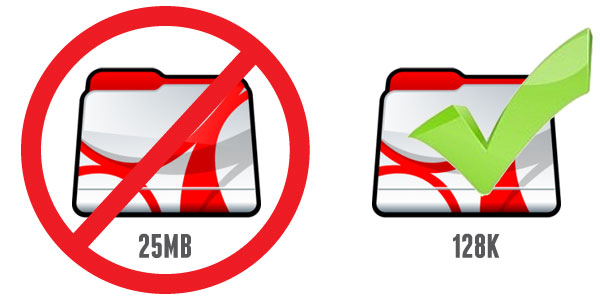
The best place to implement compression is within our PDF files. Certainly we want to create high resolution artwork (for those times that the printer prefers PDF). But when it comes to making brochures, sales sheets, manuals, et cetera available on our websites, what’s the point in posting that huge 250MB file? The chance that they are going to print it is very slim, so creating a low resolution file that’s great for online viewing is what we need.

There are several levels of PDF compression. By default, a high resolution PDF (preferred by printers) contains 300dpi images and uncompressed text and vector elements. These types of files are extremely bloated, resulting in very long load times – which is fine when you are sending art to a printer… it only needs to be uploaded and downloaded once.

Adobe has developed several compression presets. The two I most widely use are High Quality and Smallest File Size. High Quality is great for creating artwork or high res proofs. Smallest File Size is great when you need to make files available on a website for download. The downside to the Smallest File Size preset is very low image quality. All images are reduced to 72dpi, with a very high JPG compression. I think the best option is the sweet spot between these two presets.

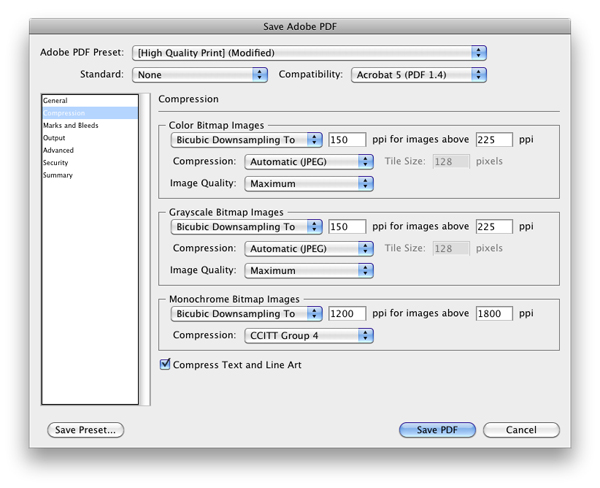
When creating a web-ready PDF file, where images need to be slightly better than web quality, I choose the High Quality preset, and modify the compression settings. Set Color Bitmap Images and Grayscale Bitmap Images to 150ppi. Also make sure that Compress Text and Line Art is checked. You can also choose to lower the ppi for Monochrome Bitmap Images as well (if your document contains them).

I usually keep JPG Compression to Automatic, but you can test your results, and choose a compression that suits your needs.

Overall, we need to be mindful of our visitors time. We need to allow them easy access to our information, at a reasonable speed.

This has been today’s Clarified Butter.
Understanding and creating your own barcodes

We’re all familiar with them, but do we understand what information they hold, and how to create them? Probably not. We just know that when the cashier scans them, the register beeps and we’ve spent some money.

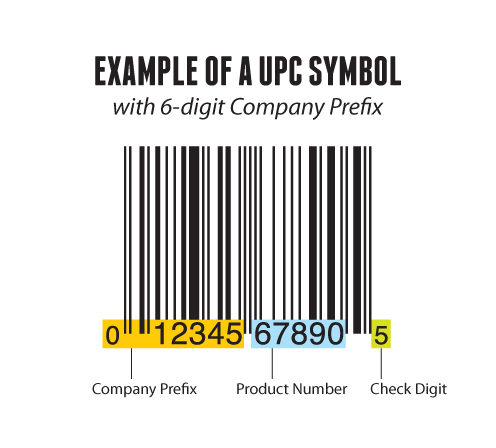
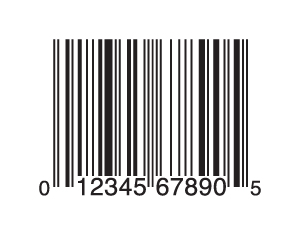
We create a lot of retail packaging, and a vital part of that packaging is having a valid UPC symbol. UPC symbols are generated from two bits of information, your company prefix, and the product number. The last number, the check digit, is automatically calculated based on the previous 11 numbers.

Above we can see an example of a UPC symbol with a 6-digit company prefix. The first six digits are assigned by GS1-US (a governing agency for the assignment of manufacturing codes). The next five digits are the product code, which is assigned by the manufacturer. And again, the last digit is a check digit based on a calculation of all of the other numbers (which I won’t go into here, since there are tools that do the math for us).

It’s important to note that you cannot simply create your own company prefix, and resulting UPC symbols, without first obtaining one from GS1-US. This is so you don’t accidentally use a number that already exists, which would really cause problems for retailers.

In a past post, I explained QR codes, which have quickly become popular. These QR codes can be generated by anybody, and do not require any assigning agency or government oversight. In addition to QR codes, there are hundreds of other barcodes that various businesses use internally to help streamline their processes. ITF-14 is a good example. I use ITF-14 as SKU numbers for pallets and multiple-unit cases. These ITF-14 numbers are also assigned by GS1, and are used to encode a Global Trade Item Number.

So, now that we know what these barcodes are, how do we create them? For years, I had been receiving physical artwork for UPC symbols from clients. Obviously this is a pain, requiring that I scan the barcode in, and if you have been reading this blog, that doesn’t provide me with a vector version I so desperately desire.

Recently, I’ve been using a neat little tool I found called the Online Barcode Generator. This no-frills generator is extremely powerful. It allows for the creation of hundreds of different types of barcodes, automatically calculating that check digit, if needed. It provides the resulting barcode in PNG, JPG, and yes, EPS format. I obviously opt for the EPS format. It quickly opens in Illustrator. The barcode lines are strokes, and numbers are actual text (Helvetica), so I quickly outline the strokes and fonts to alleviate any scaling issues.

So, there you have it. Barcodes and how to create them. Go barcode crazy!

This has been today’s Clarified Butter.
Corporate greed, or just doing business

I recently received an email informing me of my inclusion as a member of a class action lawsuit against Netflix. I usually just delete these things (or recycle as needed), but this one caught my attention. Apparently a couple of gentlemen from Virginia decided to sue Netflix for retaining their personally identifiable information for at least a year after they cancelled their accounts.

Their personally identifiable information was described as:

  • Names, phone numbers, and address
  • Billing information, including credit card numbers
  • All previously requested DVDs and instant titles
  • DVD and instant queues
  • Preferences and ratings on watched titles

I can agree that Netflix does retain ALL of this information. Having been a subscriber to their DVD service seven years ago (opening and closing an account in 2005), I opened an account in 2011 to discover that my queue still existed, along with a list of all DVDs ever mailed to me, my old credit card number including expiration dates, and all of my ratings.

Now, part of me feels this is an invasion of my privacy, and a potential security risk. On the other hand, how helpful that all of my ratings and viewing history had been retained so that I could pick up right where I left off (so to speak). However, the U.S. Government had already made the conclusion for me…

Apparently, there is some 1980’s federal law which prohibits “video tape rental providers” from retaining rental history a year after its original use. I know, you are sitting there wondering how this applies to Netflix. I thought the same thing. Netflix has never provided video tapes for rental, or sale for that matter. Nonetheless, the law was interpreted by the court that it apply to similar rental services. I can imagine the bickering back and forth with Netflix lawyers explaining the difference between circular DVD platters and rectangular VHS tapes.

So, what exactly was Netflix trying to accomplish? Were they retaining that information to help customers that potentially would come back, or to line their pockets by selling my information to third parties?

This case provides a great opportunity to examine our current laws, especially those which were written before the great advances in technology over the last two decades. Laws which govern piracy, internet technologies, fair use, copyrights, net neutrality, and much more. We need laws that are clear to understand.

Another bone of contention for me, with class action lawsuits, is the enormous amount of cash heaped upon the class action attorneys. In this Netflix case, attorneys are being rewarded $2.5 million, plus $250,000 in reimbursement (because, you know, that $2.5 million just ain’t gunna cut it). The two class action representatives will each be awarded $15,000 (you now, the guys actually ‘damaged’ by Netflix), and all of us other class action members get $0. Zip. Zilch. Nada. Apparently, any money left over gets donated to not-for-profit organizations determined by the court.

Only once have I ever opted out of a class action lawsuit (some sort of judgement against Apple which I didn’t think was fair). I really don’t think it’s worth my time to actually look into these class action suits, and opt out. Maybe I should. You never know. I might get another 7¢ check from an eBay settlement.

This has been today’s Clarified Butter.
Create a custom Facebook Business Page Tab for the new Timeline layout

Facebook recently announced that Facebook Pages for Businesses will be receiving the same new Timeline layout that personal accounts have had for some time now. I know, I know, most of you are getting sick and tired of the constant changes over at Facebook, but I think this new layout is awesome.

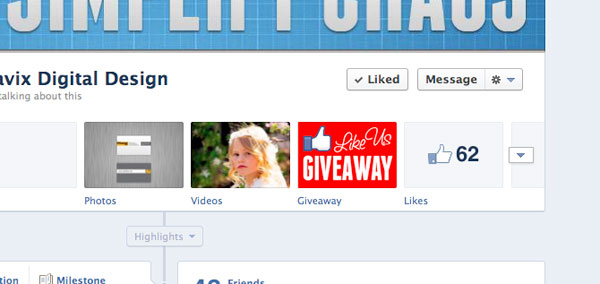
Over the past couple of days, I’ve been trying to figure out how to add a custom Page Tab in this new layout. Page Tabs are those rectangular thumbs below your cover photo (which include a tab for Photos and Likes by default). Any apps you have installed would also be presented here.

I could easily create the Page (the actual page that shows the content), but getting the actual Tab to show up on my Facebook Business Page wasn’t so easy…

In this post, we’ll be discussing how to create a Page Tab to display custom content inside of Facebook. In other words, create a website page within Facebook that is associated with your Business Page. This is useful if you want to post a coupon, promotion, or other content that doesn’t fit elsewhere on your Facebook Business Page.

The Page Content
Before you do anything, you need to create the actual content to display within the Facebook page. I won’t go into specifics with this, since this is outside the scope of Facebook (and this post). In general, you need to create an HTML page, using any technology you prefer, such as HTML, CSS, PHP, JS, etc. My only suggestion is keeping the content no wider than 790px. It’s also best not to have the content very tall. If you do, those ugly iFrame scroll bars will likely appear. Once you have your content developed, it needs to be available online. If you need help developing the content, and/or adding it to Facebook, please contact us.

For the purpose of this tutorial, let’s assume your content is created and available at http://www.example.com/facebook/index.html.

The Facebook App
Don’t go running off now! Yes, we are going to create a Facebook App, but only for the purpose of creating the Page Tab. You don’t need to be a developer, or know anything beyond what you already have in your noggin. Go to https://developers.facebook.com/apps and click on Create New App.

Enter a name for your App. This isn’t really important, since you are going to be the only one that sees it. Also, namespace is not needed since we are just creating this app for a Page Tab. Click Continue, and complete the CAPTCHA security check.

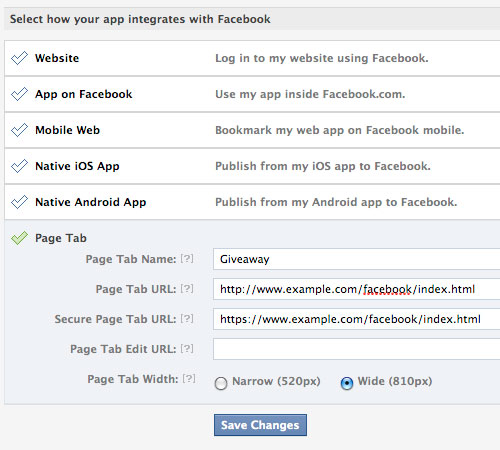
On the Basic Settings page for your newly create app, no further information is needed under Basic Info, so click on the Page Tab selection at the bottom.

For Page Tab Name, enter the name you would like to appear below the button on your Facebook Page.

For Page Tab URL, enter the URL where the content exists on your server. Our example above was http://www.example.com/facebook/index.html.

For Secure Page Tab URL, enter the SSL URL where the same content exists on your server. This would be a URL that starts with https://. For example, https://www.example.com/facebook/index.html

You can leave Page Tab Edit URL blank, choose Wide (810px) for the Page Tab Width and click Save Changes.

Now, the part that was nearly impossible to figure out. I’m not sure why Facebook doesn’t provide a way to install the app to your page from within the app’s settings page. Maybe this is a glitch that will be cleared up soon. While you are still on your app’s basic settings page, make a note of your App ID and Page Tab URL (which in our example is http://www.example.com/facebook/index.html). Open a new browser window and go to:

https://www.facebook.com/dialog/pagetab?app_id=ENTER_APP_ID&next=ENTER_PAGE_TAB_URL

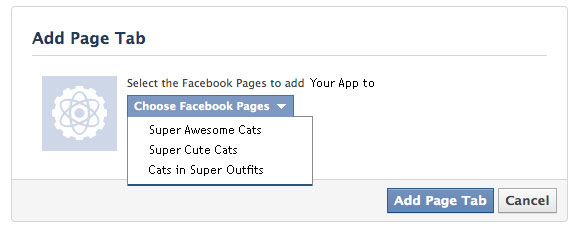
Make sure to replace ENTER_APP_ID and ENTER_PAGE_TAB_URL with your variables. Hit enter, and then choose the page you wish to install your new App to.

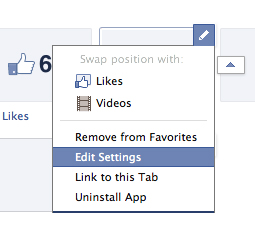
Now, go back to your Facebook Business Page. You will now see the new Page Tab button, and the name you chose below it. As of right now, it shows the default Facebook App icon. To change this, click on the triangle to the right of your page tabs, then hover over the new tab and click the pencil to pull up the options. Click Edit Settings. When the new window appears, click on Custom Tab Image and follow the steps.
Test your new Page by clicking on the Page Tab. The content you have posted to your server will now be displayed within Facebook.

This is a simple implementation of a Facebook Page Tab. Page Tabs can be enhanced to perform many advanced functions. The most popular is a like-gate, where you hide content, such as coupons or promo codes, from visitors until they Like your page. Hopefully a future blog post will cover this, but for the time being, I think getting this far using the new Timeline layout for Facebook Business Pages is a huge accomplishment.

To see an example of a working like-gate experience, head on over to our current promotion on Facebook (promotion has expired). This is using the same method we just outlined, with the added like-gate code (wherein we hide the entry form from the visitor until they like our page). While you’re there, like us so you can be entered to win a Professional Logo Design Package, valued at over $350!

This has been today’s Clarified Butter.

Present proofs with impact

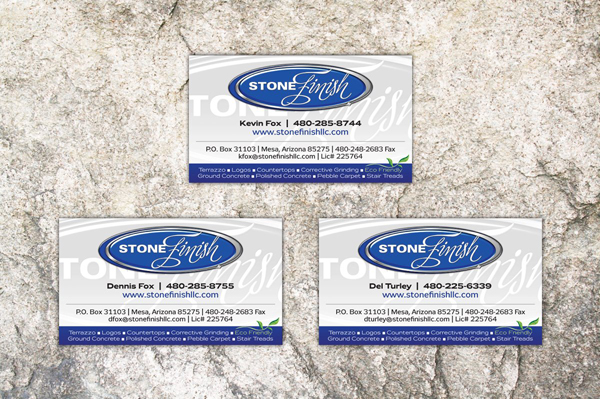
We provide 100% of our proofs digitally, over the web. It’s important that you create a proof that helps present all that encompasses your design. With all items, even those intended to be flat, such a business cards, it’s still important to go beyond the design of the piece, and present it in a real-world environment. What would that card look like on a client’s desk? How will that box present itself in a retail environment?

The majority of proofs we create are displayed online, via a custom proofing area for that specific project or client. This affords us the ability to use web development techniques to create a dynamic presentation.

When we develop a logo, usually creating four or five different concepts, we take our favorite and develop letterhead, envelope, and business cards. These pieces fully integrate the logo. In the end, they might not accept that logo, but it gives them the insight that other ideas can be just as, if not more, engaging.

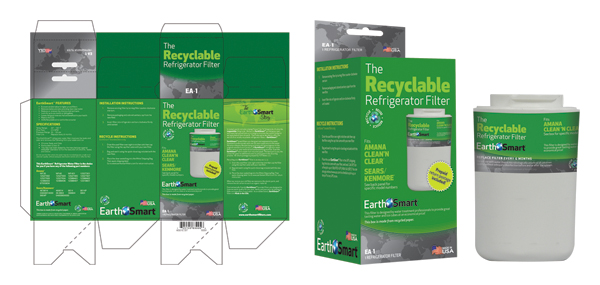
We develop a lot of packaging material. Certainly flat proofs are sent so that they may review the actual printed content, but it’s also important to present that packaging in a real world example. This helps the client understand your design, explaining why you used the colors you did, or why you wrapped certain elements around the box. We’ve had clients question a design, but not until they saw the real world example did they really understand and accept the design.

It might be difficult or seem like an unnecessary step, but in the end, it will really help push the ideas that you create. As designers, it’s difficult for us to get the client to envision what we see. This is a simple way to accomplish that. And, if you haven’t noticed, we love simple.

This has been today’s Clarified Butter.

Simplicity, a core value

Steve Jobs once said that one of the greatest ad campaigns, “Got milk?,” isn’t even about the product. It’s about the absence of the product. Now, think about that…

It’s true that some of the world’s best known brands are much less about themselves, and more about others who portray what the brand’s core value is. Marketing experts envision an entire ecosystem for the brand, from packaging and distribution, to dynamic retail displays. To me, establishing a new brand or corporate identity starts with a logo.
Now, you may think that a logo must represent a company’s products or service. This is not necessarily the case. In keeping with our simplicity ideology, less is more. Much more. It’s not a requirement that the logo actually include an illustration in-keeping with the brand’s genre. It’s much more important to design a logo that will be rememberable. For example, think about Nike, Target, or Tide. Their logos are clean, crisp, and very much rememberable. We know that the swoosh is Nike. Nike, and a slew of well paid marketing experts, made sure of that.

So how can we achieve this for your new brand? Invoke simplicity. Don’t overdo it. Many designers will, and those are the brands that will fail. If a logo is busy, cluttered and overbearing, the potential customer will feel the business shares these same attributes, and will look elsewhere.

So, if you are in the market for a logo or a identity refresh, let us help. It certainly can’t hurt, especially since we offer a 100% money-back guarantee.

This has been today’s Clarified Butter.

Make and receive calls with an iPod touch

I’ve been part of the growing mass that has dropped their landline in favor of a mobile-only phone connection. I’ve been, officially, without a landline for six years. The seven years prior to that a landline was primarily used for fax and dial-up.

I’m hardly ever on my cell phone. I much prefer communicating via email. It provides all information I need in a readable form, that I can organize, and easily access if needed. There are times, however, when a phone call is required, and I’m sure we’ve all experienced those overage charges that can really cut into your profits.

So how do I alleviate my mobile overage problem? I make outbound calls on my iPod touch via a wifi connection. I’ve been doing this for a while, but have really been pushing it lately since my cell phone use has dramatically increased.

Here is what you’ll need to use your iPod touch as a phone:

Google Voice
Before Google acquired this technology it was called GrandCentral. I had a GrandCental account, and was part of the invited group to move over to Google. In the beginnings of Google Voice you had to be invited to participate. Fortunately my invite came via the acquisition process.

To get a Google Voice account you will need a Google Account. For most, this means having a Gmail account, but you can have a Google Account and not use the Gmail service. I will say, however, that to fully utilize your iPod touch as a phone, you will need a Gmail account and Google Account. The reason is that we need to access Google chat, which is part of Gmail. I won’t go into the specifics here, as it seems fairly straight forward, but make sure you have both a Google Account (using the @gmail.com address) and a Gmail account.

When you first setup a Google Voice account you are asked to choose a phone number. You specify a city or area code, then they provide a list to choose from. Choose your number and setup your account.

Talkatone
Install Talkatone from the App Store. When you launch the Talkatone app the first time, you will be prompted to enter your Gmail email address and password. Make sure to use the Gmail account you used to setup Google Voice. Talkatone doesn’t require a special account. Instead it uses your Google Account to connect to Google services.

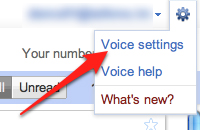
Login to your Google Voice account, go to Voice settings (access them via the little gear in the top right of the browser window). On the ‘Phones’ tab, check the box next to Google chat. Make sure to log out of all Google services, including Voice and Gmail.
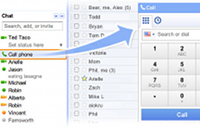
Now, go to www.gmail.com and login using the Google Account/Gmail account you used to signup for Google Voice. Find your contact list and click on the Call Phone action at the lower left section of the page. Make one call with the phone widget in GMail to your regular phone number. This step allows Talkatone to access the service, telling both Talkatone and Google that you’ve successfully setup Google Voice.

Finally, make sure to sign out of all Google services, including Voice, Gmail, and GTalk. If you don’t, calls made to your new Google Voice number will be forwarded to Gmail/GTalk and your iPod touch will not ring.

Come back to the Talkatone app and tap the ‘I did make a call from GMail web chat’. That way Talkatone will know that you successfully setup Google services.

You can now make and receive calls via Talkatone on your iPod Touch. Use the keypad to dial numbers direct, or use your Contact list. Get comfortable with Talkatone and visit the Settings tab. Make preferential selections for Notifications and Sounds.

And to clarify, you must have Talkatone open in order to receive calls. It’s not important that it be active, only that it be open and in suspended mode (aka multitasking). You can quietly keep it open while you use other apps on the device. When a call comes in, you will be notified (if you’ve setup your notifications as such).

I’d also like to say that while Talkatone supports SMS via Google Voice, I much prefer the Google Voice app for my texting. This didn’t use to be the case, but since Google Voice added landscape support, I’m sold on their app.

This has been today’s Clarified Butter.

Organize and archive your workflow

When I first started in graphic design, back before CD burners and cheap platter storage, we used 3.5″ floppy disks to store customer’s digital artwork. We had a rack on the wall that held several hundred disks, all labeled and marked with numbers. Those numbers correlated with a database stored on the computer which listed what each disk held. It was quite cumbersome, but really all that was affordably available at that time.

Over the years we moved to larger tape drives, zip drives, flash, and so on, until we eventually came to DVDs and hard drives. We’re at the point now where regular consumers can have terabytes of storage, locally or on their network. And at prices that are remarkably cheap.

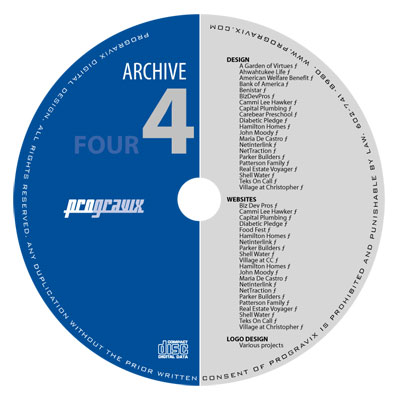
I’m very picky in the way I organize my files. All of my personal projects have their own folder. Business files have their own folder. Current websites have their own folder, as does current design and current video project. All websites are organized by domain, and all design projects are organized by client name. Any web sites or clients that are considered ‘dormant’ are moved to ‘archive’ folders. These archived folders are then moved onto DVDs for permanent backup. I should also point out, during all of this time, all files on every computer on our network are backed up in three places (delta, every hour), automatically. So, if a drive or DVD were to go bad, we could always find a replacement somewhere.

Now, when it comes to naming your files, be specific. I had someone chuckle when I used the accent marks on résumé instead of just typing resume. I had to explain that résumé (that important piece of paper you provide with a job application) and resume (starting a process which had been paused) are different. If I wanted to search my computer to find a résumé, it would be much quicker as all instances of resume would be removed.

Also, if you don’t know which project a piece is attached to, ask! It’s better to be organized when they come back 2 years down the road and want to make a change to the flow chart for the XYZ project. If you had simply named it ‘flow_chart_32’, it’s going to be a lot more difficult to find. Store it in a folder named ‘XYZ’ inside the client’s folder. This might seem overly simplistic, but I’ve worked with individuals that were very sloppy, and stored practically everything on their desktop. I’m not saying that’s bad, but ProGravix doesn’t allow it.

This has been today’s Clarified Butter.