Update: Amazon’s Fire TV

Three years ago I wrote a post about watching local content on Amazon’s Fire TV via Plex. At that time, we watched content via Mac minis connected to LED TVs. The main problem with this approach was the accessibility to online services such as Amazon Prime Video and Netflix. You had to wrangle a keyboard and mouse from the couch, and that was just cumbersome (and not kid-friendly).

I expressed my desire in that post for Amazon to release a stick version of their Fire TV, similar to Roku’s Streaming Stick. I had tried out Roku’s stick, and didn’t like it much. Well, they did eventually release a Fire TV Stick, but I opted to purchase the full boxes instead.

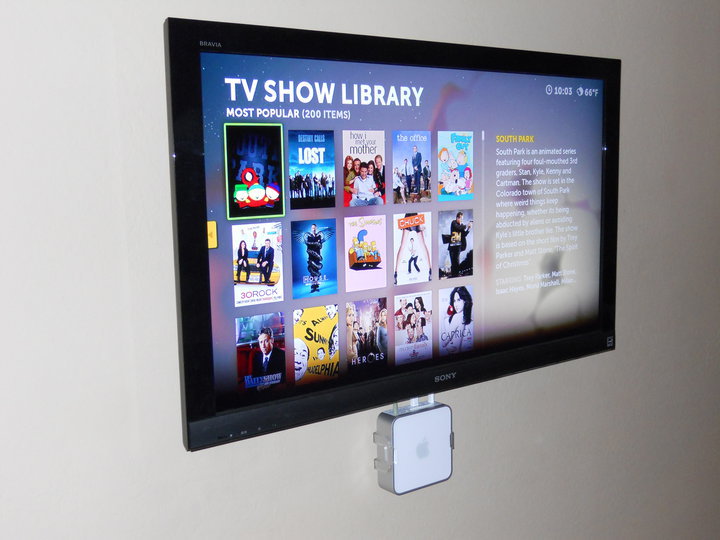
Since that post, we have converted to watching content via Fire TVs connected to those same LED TVs. We still have those Mac minis connected (although they mainly serve their purpose as Plex Media Servers and OTA DVRs). These Fire TV boxes are great, and fairly stable. We mainly watch Plex content on them, but they are also an easy way to consume Amazon’s video and music library, while also providing easy access to YouTube (a service I thoroughly enjoy watching vlogs [and the occasional fail compilation] on).

Since purchasing those Fire TVs, we delve even deeper into the Amazon ecosystem and purchased Fire tablets for the boys. I was hesitant to adopt the Android platform (being so firmly in the iOS camp), but it works great for the boys (who also have their own iOS devices to keep them grounded in truth). Don’t get me wrong, I will always be loyal to iOS, and I would never buy an Android phone. But for cheap tablets, these things are great.

This has been today’s Clarified Butter.

Watch your local content on Amazon Fire TV

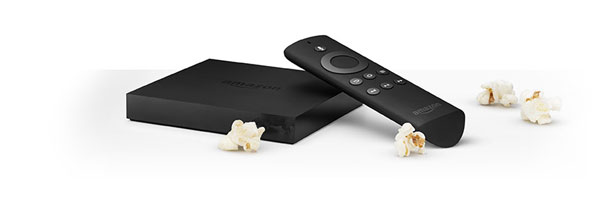
A few days ago Amazon released their offering in the streaming box arena (what is sometimes referred to as a set-top box). It’s called Fire TV, and it’s creating quite the buzz.

Fire TV

The competition is fierce in this area, with solutions from Apple, Roku and Google already established as the go-to guys. At $99, the price matches Apple TV and Roku 3, and to be honest we really can’t compare it to Google’s Chromecast at $35. Not a cost comparison, but the lack of Chromecast’s features.

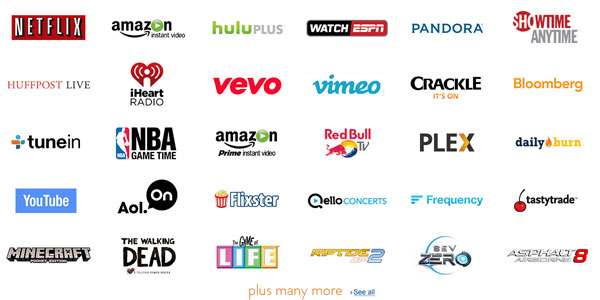
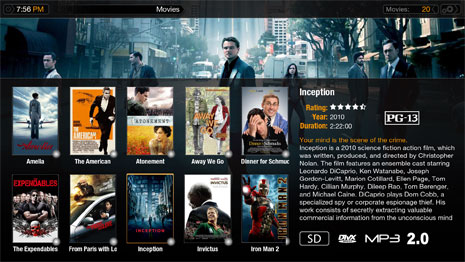
But to me, the game changer here is Fire TV’s support for existing Android apps (from Amazon), and most importantly, Plex, which is supported right out of the gate. Apple TV has no officially supported Plex client, and Roku’s UI gives me a splitting headache. The Plex client for Fire TV is Plex for Android, and it’s already been around for a while, and the UI is excellent. Not Plex Home Theater excellent, mind you, but better than Roku.

fire_tv_apps

For a while, Roku has been the easiest (and cheapest) way to get Plex on your TV. I purchased Rokus for my father and father-in-law, which allows them to see the content I share with them via Plex. I still prefer to run Mac minis on my TVs, but I am seriously considering this Fire TV as a future Plex client when my minis can’t cut it anymore (seeing as how they are pushing 5 years old).

The majority of 1-2 star reviews for Fire TV complain that you cannot access your local media (via DLNA or otherwise). I would imagine that the vast majority of Fire TV users are obtaining their content from providers like Netflix, Amazon Instant Video, Crackle, etc. But, for those individuals that have local content, Plex is the answer. All it requires is that you install Plex Media Server (free) on your supported Mac, Windows, or NAS device, and purchase the Plex for Android app for the Fire TV. Once you setup Plex Media Server with all of your media, it presents itself beautifully on the Fire TV Plex for Android app.

Now, if I can gripe for just a moment here.

I recently tried out the Roku Streaming Stick. It’s a great little device, but again, the interface is horrible. Netflix looks pretty good on it, but that’s about it. Amazon Instant Video and Plex channels share the same common look and feel. It’s difficult to browse content, and it’s plainly not fun to use.

The positive, however, is that it’s a stick. It plugs right into your HDMI port, with the power being drawn from the TV’s USB port. If your TV doesn’t have a USB port, you can plug it into a regular power outlet with the included adapter. I would love to see a similar solution from Amazon. I’m all about less clutter. If I can have a TV hanging on the wall with no devices dangling from it, or power cords junking up my living room, I’m a happy camper. I’d be fine with giving up ethernet, optical audio and USB if I could have a Fire TV stick.

All this being said, I’m going to hold off a bit longer to see what Apple’s answer will be. If they release an Apple TV stick that supports iOS apps (including Plex), with a remote and game control via iOS devices… that… that would be awesome.

This has been today’s Clarified Butter.

A, B, G, N, AC… now I know my wifi terms…

I heard Downton Abbey was good.

Okay, I know it’s good. My wife and I are addicted. Heck, my parents got into it and tore through an entire series in a few days. And before I leave the topic of Downton, I find it strange that they call their seasons series. I’m not sure if this is a UK thing, but it really confuses the heck out of me. What happens when the show ends? You can’t call it the Series Finale… they’ve already had three of those. So what would it be called? Also, if they continue on with these Christmas Specials (which really aren’t Christmas Specials at all, but in fact extremely important episodes illustrating continuity), I think I just might lose it.

Anyways… why even bring it up. Oh yeah…

We watch Downton Abbey in glorious 1080p HD quality. The show files themselves reside on a Mac Mini upstairs, running Plex Media Server. We mostly consume the shows downstairs via a Mac Mini running Plex Media Center, which is connected to a Sony LCD TV capable of 1080p. The troublesome connection in this setup is transferring data between the two Mac Minis. Neither are physically connected to each other, nor are they on wired networks. They are both dependent upon a wireless connection.

At the center of our home network is a Netgear 802.11g/n router capable of simultaneous dual bands, with speeds of up to 900Mbps. Each Mac Mini is capable of communicating over both bands (2.4GHz and 5GHz) in B, G or N. In addition to these Minis, we have various other devices throughout the house that consume media wirelessly (laptops, iPod touches, etc.)

Recently the 5GHz radio in my dual band router decided to die. Luckily, the 2.4GHz band kept on running. The router was only four months old, so luckily it was covered under warranty (which unfortunately was not an easy process).

The problem with this dead radio was that the Mac Minis transmitted data over the 5GHz band. In my setup, the 5GHz band provided the fastest possible speeds, and allowed streaming of 1080p content. Now that the 5GHz band was gone, we began experiencing constant stuttering and buffering – since the 2.4GHz band was not providing the necessary bandwidth.

There are many reasons for this, some of which are listed here.

  • Neighbor congestion
    The area around my house has no less than 10 wifi signals operating on the 2.4GHz band. This band only has three unique channels (1, 6 and 11). I was operating on channel 6, but the neighboring channels 2, 3, 4, 5, 7, 8, 9 and 10 were causing interference – which results is lower transmission speeds and shorter broadcast distances.
  • Legacy devices not capable of 450Mbps
    A 2.4GHz wireless network is only as fast as the slowest client connected. So, if you have a 802.11b device connected to your network, your speeds cannot exceed 11Mbps (the maximum throughput for 802.11b devices).
  • Improper placement of router
    Something as simple as changing the placement of the router can affect its broadcast capability. Move it away from metal objects, or other electrical devices which may deflect inbound and outbound traffic.
  • Interference from other electrical devices
    Similar to neighboring wifi networks, interference from household appliances can wreak havoc on your 2.4GHz wifi network. Microwaves transmit on this frequency to heat your food. Some cordless telephones use this frequency, and don’t forget about that baby monitor.

The 5GHz band is still susceptible to interference. Weather stations and some military branches use the 5GHz band, and for this reason wifi routers are limited to the amount of power they can transmit. The 5GHz band has more channels than 2.4GHz’s 11 bands, and none of them overlap. The lower bands are limited in their power output, while the higher bands can transmit at a higher wattage. So, in short, it’s best to use a higher channel to achieve maximum speeds and distance. As time progresses, and 5GHz devices become cheaper, they will be more broadly installed and more susceptible to neighboring interference. The newer 802.11ac standard, which promises 1Gbps throughput, should be fully embraced by 2015. This new standard uses the 5GHz band – only adding to the congestion.

Overall, using the 5GHz band doubles my transmission rate over 2.4GHz. If you don’t have a dual band router – yet use a myriad of devices all communicating on different standards – I suggest investing in a dual band router. Setup each band with it’s own SSID, and make sure 5GHz capable devices are using the 5GHz SSID, and slower legacy devices are using the 2.4GHz SSID.

This has been today’s Clarified Butter.

Understanding and creating your own barcodes

We’re all familiar with them, but do we understand what information they hold, and how to create them? Probably not. We just know that when the cashier scans them, the register beeps and we’ve spent some money.

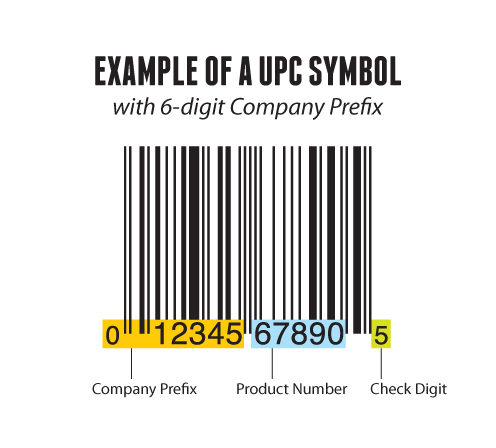
We create a lot of retail packaging, and a vital part of that packaging is having a valid UPC symbol. UPC symbols are generated from two bits of information, your company prefix, and the product number. The last number, the check digit, is automatically calculated based on the previous 11 numbers.

Above we can see an example of a UPC symbol with a 6-digit company prefix. The first six digits are assigned by GS1-US (a governing agency for the assignment of manufacturing codes). The next five digits are the product code, which is assigned by the manufacturer. And again, the last digit is a check digit based on a calculation of all of the other numbers (which I won’t go into here, since there are tools that do the math for us).

It’s important to note that you cannot simply create your own company prefix, and resulting UPC symbols, without first obtaining one from GS1-US. This is so you don’t accidentally use a number that already exists, which would really cause problems for retailers.

In a past post, I explained QR codes, which have quickly become popular. These QR codes can be generated by anybody, and do not require any assigning agency or government oversight. In addition to QR codes, there are hundreds of other barcodes that various businesses use internally to help streamline their processes. ITF-14 is a good example. I use ITF-14 as SKU numbers for pallets and multiple-unit cases. These ITF-14 numbers are also assigned by GS1, and are used to encode a Global Trade Item Number.

So, now that we know what these barcodes are, how do we create them? For years, I had been receiving physical artwork for UPC symbols from clients. Obviously this is a pain, requiring that I scan the barcode in, and if you have been reading this blog, that doesn’t provide me with a vector version I so desperately desire.

Recently, I’ve been using a neat little tool I found called the Online Barcode Generator. This no-frills generator is extremely powerful. It allows for the creation of hundreds of different types of barcodes, automatically calculating that check digit, if needed. It provides the resulting barcode in PNG, JPG, and yes, EPS format. I obviously opt for the EPS format. It quickly opens in Illustrator. The barcode lines are strokes, and numbers are actual text (Helvetica), so I quickly outline the strokes and fonts to alleviate any scaling issues.

So, there you have it. Barcodes and how to create them. Go barcode crazy!

This has been today’s Clarified Butter.

Update: No subscription TV service

A little over a year ago I wrote a post detailing my one year anniversary into an experiment testing having no subscription television service. With it now being two years with no TV service, I thought I would provide an update and let you know how it’s going.

The good news is that I still do not subscribe to any television service. That means no cable, no satellite, nothing. The only exception is Netflix, which at $8 a month, I am happy to have. Some might argue that Netflix is a subscription service, but I think we can all agree that it certainly does not compete with cable or satellite (and is a tenth the cost of what I used to pay).

To date, I have saved $1,920 (not counting the increase in fees that Dish Network would certainly have imposed). This easily has paid for the substantial initial investment in hardware (mainly new Mac Minis and various other peripherals). We still use Plex, eyeTV, Hulu Desktop and a few other apps. We do most of our viewing in Plex, although my wife would argue that I spend a lot of time in eyeTV watching COPS episodes which have recorded overnight. I’m sorry, it’s a guilty pleasure.

Plex continues to become more and more stable. It’s install base is growing by leaps and bounds, given that it’s now available on iOS, Roku, Google TV, LG, and various other media devices. I love that I can start a show on my iPod, pause, and pickup right where I left off in the home theater. Additionally, with the fairly new myPlex service, you can easily access all of your movies and TV shows remotely with no effort at all. You just sign into myPlex, and all of your media stored at home is available.

Certainly Netflix’s catalog is lacking… their loss of Starz Play’s 1000 titles didn’t help. In our house, Netflix is great for the kids. It’s jam-packed with child-friendly programming. Now and then you might run across something suitable for adults, but for the most part my instant queue (and recommendations) makes me feel like I am in preschool. Amazon’s Instant Video service is becoming a solid competitor to Netflix, but seeing as how they provide no 10-foot user interface for Mac (you must access the titles via a browser), I’ll stay with Netflix (which plays via Apple remote in Plex).

I’m not saying this setup is for everybody, but to me, it’s been a success.

This has been today’s Clarified Butter.

Spam, we hardly knew ye

You’d think that having such a dominant online presence, I would be much more susceptible to spam. The truth is, I hardly ever see it. You’re probably sitting there wondering what the heck I am talking about. Everybody gets spam, right? We’re always clogged up with viruses, avoiding overseas scams, and constantly shuffling through our junk folder to find that one good email accidently flagged as naughty.

Not me.

First off, we use Macs here, running one flavor of Mac OS X or another. We’re insane about our backup techniques, and never download anything from the internet unless it’s from a reputable source. So, let’s throw the fear of viruses right out the window.

I came across this solution when I was trying to solve a problem with iOS not having a junk mail feature. I had never used the Junk Mail feature in Mac Mail, my preferred email client, and preferred to let everything accumulate in my inbox. This was fine at first, but when the spam really started to flow, I needed a solution. That solution couldn’t be based on Mac Mail’s junk mail feature, because I never wanted the spam to be downloaded in the first place. This meant that it had to be taken care of at the server level.

We use Google Apps for our email and other online needs, but for the purposes of this post, Gmail functions exactly the same way. We need to setup a filter within Gmail that stops the spam from ever getting sent to our inbox.

If you don’t have Gmail (or Google Apps) I highly suggest you get it, and forward all your mail there. It’s up 99.9% of the time, and dang easy to setup and use.

Let’s set this up.

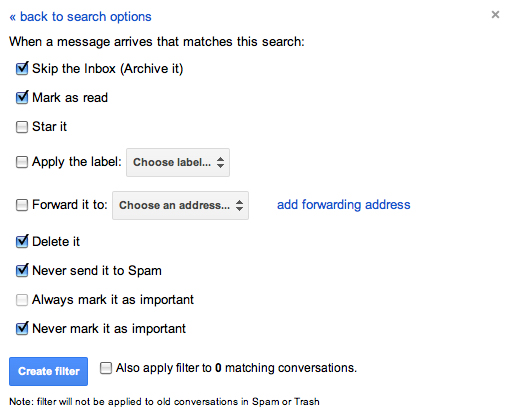
After you’ve logged into Gmail, go to Settings and click on the Filters tab. Click ‘Create a new filter.’ In the resulting window, enter “is:spam” (without the quotes) in the ‘Has the words’ field and click on ‘Create filter with this search.”

A dialog will pop up warning you that using “is:” will never match incoming mail, but I can assure you, it does. Click ‘OK’.

On the next window, check the following:

  • Skip the Inbox (Archive It)
  • Mark as read
  • Delete it
  • Never send it to Spam
  • Never mark it as important

This will put all mail that Google considers spam into the Trash folder. It will appear as already read (so you won’t have any unread flags). This is also good because Trash is automatically deleted in 30 days, so you never have to go in and manage your junk mail. It also gives you a 30 day window to find any messages inappropriately flagged as spam. I can tell you, however, that for me, not once has a legitimate message been flagged as spam by Google. All my junk goes directly to the trash and I never see it.

Now, just to get a similar setup with my local Letter Carrier. Maybe she can put it right in the recycle so I don’t have to touch it.

So, there you have it, a great solution for spam management that’s easy and effective.

This has been today’s Clarified Butter.

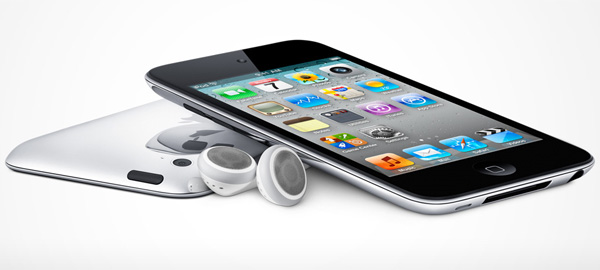
Make and receive calls with an iPod touch

I’ve been part of the growing mass that has dropped their landline in favor of a mobile-only phone connection. I’ve been, officially, without a landline for six years. The seven years prior to that a landline was primarily used for fax and dial-up.

I’m hardly ever on my cell phone. I much prefer communicating via email. It provides all information I need in a readable form, that I can organize, and easily access if needed. There are times, however, when a phone call is required, and I’m sure we’ve all experienced those overage charges that can really cut into your profits.

So how do I alleviate my mobile overage problem? I make outbound calls on my iPod touch via a wifi connection. I’ve been doing this for a while, but have really been pushing it lately since my cell phone use has dramatically increased.

Here is what you’ll need to use your iPod touch as a phone:

Google Voice
Before Google acquired this technology it was called GrandCentral. I had a GrandCental account, and was part of the invited group to move over to Google. In the beginnings of Google Voice you had to be invited to participate. Fortunately my invite came via the acquisition process.

To get a Google Voice account you will need a Google Account. For most, this means having a Gmail account, but you can have a Google Account and not use the Gmail service. I will say, however, that to fully utilize your iPod touch as a phone, you will need a Gmail account and Google Account. The reason is that we need to access Google chat, which is part of Gmail. I won’t go into the specifics here, as it seems fairly straight forward, but make sure you have both a Google Account (using the @gmail.com address) and a Gmail account.

When you first setup a Google Voice account you are asked to choose a phone number. You specify a city or area code, then they provide a list to choose from. Choose your number and setup your account.

Talkatone
Install Talkatone from the App Store. When you launch the Talkatone app the first time, you will be prompted to enter your Gmail email address and password. Make sure to use the Gmail account you used to setup Google Voice. Talkatone doesn’t require a special account. Instead it uses your Google Account to connect to Google services.

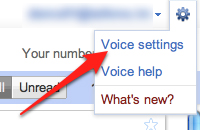
Login to your Google Voice account, go to Voice settings (access them via the little gear in the top right of the browser window). On the ‘Phones’ tab, check the box next to Google chat. Make sure to log out of all Google services, including Voice and Gmail.

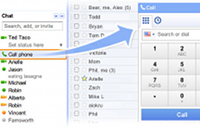
Now, go to www.gmail.com and login using the Google Account/Gmail account you used to signup for Google Voice. Find your contact list and click on the Call Phone action at the lower left section of the page. Make one call with the phone widget in GMail to your regular phone number. This step allows Talkatone to access the service, telling both Talkatone and Google that you’ve successfully setup Google Voice.

Finally, make sure to sign out of all Google services, including Voice, Gmail, and GTalk. If you don’t, calls made to your new Google Voice number will be forwarded to Gmail/GTalk and your iPod touch will not ring.

Come back to the Talkatone app and tap the ‘I did make a call from GMail web chat’. That way Talkatone will know that you successfully setup Google services.

You can now make and receive calls via Talkatone on your iPod Touch. Use the keypad to dial numbers direct, or use your Contact list. Get comfortable with Talkatone and visit the Settings tab. Make preferential selections for Notifications and Sounds.

And to clarify, you must have Talkatone open in order to receive calls. It’s not important that it be active, only that it be open and in suspended mode (aka multitasking). You can quietly keep it open while you use other apps on the device. When a call comes in, you will be notified (if you’ve setup your notifications as such).

I’d also like to say that while Talkatone supports SMS via Google Voice, I much prefer the Google Voice app for my texting. This didn’t use to be the case, but since Google Voice added landscape support, I’m sold on their app.

This has been today’s Clarified Butter.

Organize and archive your workflow

When I first started in graphic design, back before CD burners and cheap platter storage, we used 3.5″ floppy disks to store customer’s digital artwork. We had a rack on the wall that held several hundred disks, all labeled and marked with numbers. Those numbers correlated with a database stored on the computer which listed what each disk held. It was quite cumbersome, but really all that was affordably available at that time.

Over the years we moved to larger tape drives, zip drives, flash, and so on, until we eventually came to DVDs and hard drives. We’re at the point now where regular consumers can have terabytes of storage, locally or on their network. And at prices that are remarkably cheap.

I’m very picky in the way I organize my files. All of my personal projects have their own folder. Business files have their own folder. Current websites have their own folder, as does current design and current video project. All websites are organized by domain, and all design projects are organized by client name. Any web sites or clients that are considered ‘dormant’ are moved to ‘archive’ folders. These archived folders are then moved onto DVDs for permanent backup. I should also point out, during all of this time, all files on every computer on our network are backed up in three places (delta, every hour), automatically. So, if a drive or DVD were to go bad, we could always find a replacement somewhere.

Now, when it comes to naming your files, be specific. I had someone chuckle when I used the accent marks on résumé instead of just typing resume. I had to explain that résumé (that important piece of paper you provide with a job application) and resume (starting a process which had been paused) are different. If I wanted to search my computer to find a résumé, it would be much quicker as all instances of resume would be removed.

Also, if you don’t know which project a piece is attached to, ask! It’s better to be organized when they come back 2 years down the road and want to make a change to the flow chart for the XYZ project. If you had simply named it ‘flow_chart_32’, it’s going to be a lot more difficult to find. Store it in a folder named ‘XYZ’ inside the client’s folder. This might seem overly simplistic, but I’ve worked with individuals that were very sloppy, and stored practically everything on their desktop. I’m not saying that’s bad, but ProGravix doesn’t allow it.

This has been today’s Clarified Butter.

Beep. Beep. Beep. Back that thing up!

My sister recently contacted me with an issue she was having with her Early 2008 iMac. More likely than not, an issue you experience with a Mac is software-based. For my sister, however, her problem seemed very odd to me. She could use the computer for about 15 minutes, after which it would suddenly freeze, presenting a spinning beach ball.

At first, I tried using Disk Utility to verify the volume. Each check would say that the drive appeared to be okay. So, I assumed that something was wrong with the OS, given that it did take a long time to boot, and at times would present the dreaded folder with a question mark (an indication that a suitable system could not be found).

Next, I dropped in a Snow Leopard upgrade (since her iMac was running Leopard). I attempted to upgrade the OS, but it would constantly fail with 38 minutes left. And, not surprisingly, after about 15 minutes of use. Having no luck with a fresh OS install, I moved on to salvaging data. Now, mind you, my sister has no backup method whatsoever. All of her data, and most importantly, photos, all the way back from 2005 was no where but on that internal 250GB drive.

Target Disk Mode
Target Disk Mode is a method by which you can turn (almost) any Mac with a Firewire port into an external hard drive. To get the iMac into this mode, I connected the iMac to another Mac via Firewire. Next, I started up the iMac holding down the T key. Once you see the Firewire icon hovering on the screen, you are in Target Disk Mode, and the drive’s icon will mount on the desktop of your secondary Mac as a Firewire drive. This normally works great when all you have is a damaged system folder.

Unfortunately, this iMac’s problem wasn’t so easy a fix. I tried to salvage data for days, constantly hitting the 15 minute mark. This would cause the iMac to freeze and my secondary Mac (a Mac Pro) to seize as well. I had successfully retrieved all of the music, apps, books, personal documents, and all photos from 2005-2009. I couldn’t, regardless of my exhausted efforts, get any photos from 2010-2011.
The tear down
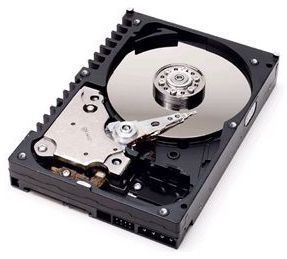
Now, I knew that something had to be physically wrong with the drive. I used an online guide and disassembled the iMac enough to get to the internal SATA drive. I pulled the old drive, and dropped in a new Seagate Barracuda SATA 500GB drive. I booted from the Snow Leopard DVD, installed the OS in a matter of minutes, and the computer was running like new!

The final recovery
Having two empty SATA trays in my Mac Pro, I installed the iMac’s SATA drive, started up, and the drive mounted on my desktop, but again, after 15 minutes, my entire computer would freeze. Only a hard reboot would bring it back up. I tried to grab those remaining photos from 2010-2011, but still, no luck. I shut down, pulled the drive out, and noticed that it was literally burning hot. I couldn’t even handle it. Now I knew for sure that something was wrong. After a little online guidance, I tried a last ditch effort. I dropped the SATA drive in a freezer bag and into a deep freezer for about 20 minutes. I pulled out the drive, installed it into my Mac Pro, rebooted, and it mounted right on the desktop. The drive performed as though it was brand new! Quickly I grabbed the remaining photos and copied them to my Mac Pro.

Restoration
I connected the iMac and Mac Pro via Firewire Target Disk Mode and copied all of the salvaged data (100% of it) back to the iMac. Finally, up and running again. My sister had her computer back the next day. Her husband said the computer was like “night and day”.

Insurance
My recommendation to her (and her husband) was to invest in an external drive for backup, utilizing Snow Leopard’s Time Machine feature. This is one of the methods I use, and it has certainly saved me more than a handful of times. I personally keep all of my data, up-to-date, in three separate locations. Two internal drives, and an external drive that is stored in a fireproof safe.

So, please be good people and backup. You’ll thank yourself some day.

This has been today’s Clarified Butter.

Content Providers: Be away with you

I used to think that I wanted a cable/satellite system that allowed me to subscribe only to the channels that I wanted, and not what the cable/satellite company included in a package. For years I paid the extra $15 a month to Dish Network to have FX included as part of the next-level-up package. Not to mention the extra $10 I had to fork over for HD, and $6 for DVR.

Yes, what I used to think. I am approaching the 1 year anniversary of canceling my Dish Network subscription, and I don’t miss it a bit. I don’t subscribe to cable or satellite television. I don’t subscribe to any entertainment, except for Netflix (which I am very happy to pay for). All of our content arrives via the internet or free over-the-air HDTV. Yes, we had a rather large initial investment in hardware, but what we enjoy now is a million times better than commercial ladened satellite or cable feed.

At the core of our entertainment system is a network of Macs running Snow Leopard and a myriad of applications. Each television is connected to a Mac Mini, and each store content that is accessible throughout the network. In addition to televisions, we have two iPod touches that also run apps that allow us to access our content locally, and remotely via the internet. We enjoy instant streaming of Netflix on all devices, free over-the-air high definition television, Hulu Desktop for when you really don’t know what you are in the mood for, and so much more.

I trust Plex
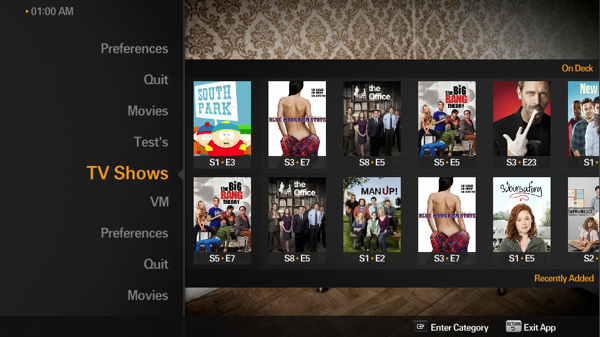
Before Plex/9 I made-do with Boxee. It seemed clunky, but it was really all there was in the 10-foot user interface arena. Plex is an application that runs on many platforms. I run it on Mac Minis, Mac Pros, and iPod touches. It aggregates all of my content that I have locally, and organizes them into movies, music, TV shows, etc. Within TV shows, it breaks it down into series, seasons, and episodes. It’s all controlled with a little Apple Remote. Viewing couldn’t be easier. I just pick the movie or show I want to watch, and it instantly displays on my HDTV, regardless of where it’s at on my network. And if I am right in the middle of a show, and I want to move to another TV or iPod touch, it remembers my place – across all devices.

Plex is free. You should give it a whirl: http://www.plexapp.com/

Netflix
I was really unsure about Netflix at first, but discovering TV shows that you missed from years past is really where it’s at. Sure, Netflix is known for their movies, but what’s available for instant-streaming certainly lacks. They seem to be working hard on that, but I think we watch way more television shows than movies on Netflix (especially the kids). Plex has an app that runs within its interface which accesses Netflix. It shows your online queue, allowing you to manage that list, you can browse movies and TV shows, and much more. It’s not perfect, but what can you expect for $8 a month.

Hulu Desktop
I hardly use Hulu Desktop, but it’s nice to have. It’s an application version of their website, and it’s available for many platforms. I mainly use it when I really don’t know what I want to watch. Sometimes I miss just clicking around the channels, and Hulu Desktop scratches that itch. Again, it’s not perfect, but hey, it’s free.

eyeTV
eyeTV is an application that allows us to watch free over-the-air HDTV through our Mac Mini. It provides DVR capabilities (to pause, rewind, fast forward, and record shows). It has basic editing controls that allow you to remove commercials, and when you are done, you can export your show and store it in Plex (or take it with you on your iPod touch).

To summerize
I think, for the most part, people are worried about using a computer as their entertainment system. They are afraid that they will be stuck with a keyboard and mouse on the couch. That’s really not the case. I think the only time I use a keyboard (wireless with a trackpad), is when I am editing shows that I recorded OTA, or when I want to use the HDTV to surf the web (the kids really like getting on Playhouse Disney with a 46″ screen).

If you have any questions about any HTPC (home theater personal computer) aspect, let me know. The more people I can move away from cable or satellite, the better I will feel.

This has been today’s Clarified Butter.