Okay, first my gripe. To all those previous Apple haters, who are now Apple lovers, it’s called an iPod touch. It’s not an iTouch. Never has been, never will be. Are you really that busy that you cannot properly spell out or say the proper product name?
But I digress.
I’ve been a proud owner of an iPod touch 3rd Generation since September 2009. I use this thing religiously. I likely use it more than my Mac Pro, and that’s saying a lot. Over the last few weeks, my internal battery has been dying, and I couldn’t even make it through 1 hour on a full charge. After considering all of my options, I decided to buy a battery, and replacing it myself. This would mean cracking my iPod open, and hopefully not have any parts left over (which is a common occurrence when I tackle such a task). The uneasiness came when I realized the battery was soldered onto the board. I’m fairly competent when it comes to soldering, but this thing has some very small connectors (three in all). I watched several videos and read many blogs explaining how to replace the battery. Seemed pretty easy. The glass and digitizer was very difficult to remove, even with the safe pry tools.
And this brings us to the meat of this post.
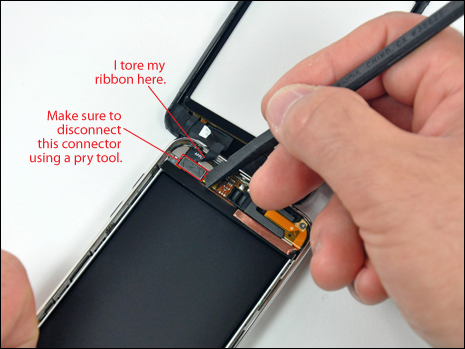
I want to warn you of a very important step, which doesn’t seem to be explained very well in all of the videos and blogs. The digitizer has a very fragile ribbon, and if you are not careful, you can easily tear it, which is what I did.

Make sure you use a pry tool to carefully disconnect the ribbon and connector from the board. One video I saw said to gently pull on the ribbon to disconnect it. This is what I did, and my ribbon easily tore.
Now, although I have an iPod touch that will charge, and hold a charge, I have no way of controlling it with touch. My only option is to control audio only with the earphone-inline-remote.
I have a new digitizer assembly on it’s way, and hopefully I can swap it out without making any more damaging mistakes.
This has been today’s Clarified Butter.
